
Sunlight streamed through the kitchen window, casting a golden glow on the countertop. The scent of fresh citrus filled the air as I reached for the juicer, knowing that a batch of tangy, buttery lemon bars would soon emerge from the oven. There’s something truly magical about combining a crisp shortbread crust and a velvety lemon filling—a balance of sweet and tart that melts in your mouth.
Whether you’re a seasoned baker or a first-time dessert enthusiast, this lemon bar recipe will surely become a household favorite. This guide covers everything from essential ingredients to expert baking tips, unique variations, and proper storage. Let’s dive into the irresistible world of homemade lemon bars!

Table of Contents
The Origin and History of Lemon Bars
While lemon bars may seem like a modern invention, their roots trace back to classic citrus desserts enjoyed for centuries. The shortbread crust, known for its rich, buttery texture, originates from Scottish baking traditions. The lemon custard filling echoes the flavors of traditional lemon tarts, which were popular in European pastry-making. However, the lemon bar as we know it today—a handheld, layered treat—first gained popularity in the United States around the mid-20th century.
By the 1960s, the classic lemon squares appeared in community cookbooks and baking contests, praised for their ease of preparation and delightful contrast of textures. Over the years, variations emerged, incorporating everything from berries to vanilla extract and even gluten-free alternatives. Despite these creative twists, the timeless version remains a favorite: a crisp, buttery base topped with a luscious, tart-sweet lemon filling, dusted with a light sprinkle of powdered sugar.
Why Lemon Bars Remain a Timeless Dessert
What makes homemade lemon bars so beloved? First, they are simple. With just a few staple ingredients—butter, sugar, flour, eggs, and lemons—anyone can whip up a batch of these treats. Second, their versatility allows for endless customizations. Want a stronger citrus punch? Add extra lemon zest. Prefer a less sweet bar? Reduce the sugar slightly.
Most importantly, their bright, fresh flavor is perfect for any occasion. Whether served at summer picnics, holiday gatherings, or as a simple weeknight indulgence, lemon dessert bars never fail to impress. Their tart and sweet balance is refreshing and satisfying, making them a go-to treat all year round.
Essential Ingredients for the Perfect Lemon Bars Recipe
The recipe for creating the ideal lemon bars hinges on selecting the right ingredients. Each component is crucial in achieving that delightful balance of sweet and tart.
Choosing the Right Lemons: Fresh vs. Bottled Juice
Always opt for fresh lemons for the most vibrant flavor. Freshly squeezed juice offers a bright, zesty taste that bottled versions can’t match. Moreover, using fresh lemons allows you to incorporate lemon zest, enhancing the citrusy aroma and depth of flavor in your lemon dessert bars.
The Role of Shortbread Crust in Lemon Bars
The foundation of any great lemon bar is its shortbread crust. This buttery base provides a sturdy yet tender layer that complements the tangy filling. Made from a simple flour, sugar, and butter mixture, the crust should be baked until lightly golden before adding the lemon mixture. This pre-baking step ensures it remains crisp and prevents sogginess.
Sweeteners and Their Impact on Flavor
Granulated sugar is the standard sweetener in most lemon bar recipes. It balances the tartness of the lemon juice, creating a harmonious flavor profile. While some might consider alternative sweeteners, it’s essential to maintain the right consistency and taste. Adjusting sugar levels can also help achieve your preferred sweetness without compromising the bar’s structure.
Optional Additions: Zest, Vanilla, and More
To elevate your lemon bars, consider incorporating:
- Lemon Zest: Adds intense citrus flavor and aromatic oils.
- Vanilla Extract: Introduces a subtle warmth that complements the lemon.
- Salt: A pinch can enhance and balance the sweetness and tartness.
While not mandatory, these additions can provide depth and complexity to your classic lemon squares.
Step-by-Step Guide to Making Lemon Bars
Crafting the perfect lemon bars recipe involves a series of precise steps. Following this guide will ensure a delightful outcome.
Preparing the Shortbread Crust
- Gather Ingredients: Combine flour, sugar, and a pinch of salt in a mixing bowl.
- Incorporate Butter: Add cold, cubed butter to the dry ingredients. Using a pastry cutter or your fingers, blend until the mixture resembles coarse crumbs.
- Form the Crust: Press the mixture evenly into a lined baking pan, ensuring an even layer.
- Pre-Bake: Bake in a preheated oven at 350°F (175°C) for 15-20 minutes or until lightly golden. This step ensures a firm base for the filling.
Crafting the Tangy Lemon Filling
- Whisk Eggs and Sugar: Whisk together eggs and granulated sugar until smooth in a separate bowl.
- Add lemon juice and zest: Stir freshly squeezed lemon juice and zest to ensure a uniform mixture.
- Incorporate Flour: Gradually add flour, whisking continuously to prevent lumps. This will help thicken the filling during baking.
Baking Tips for Even Cooking
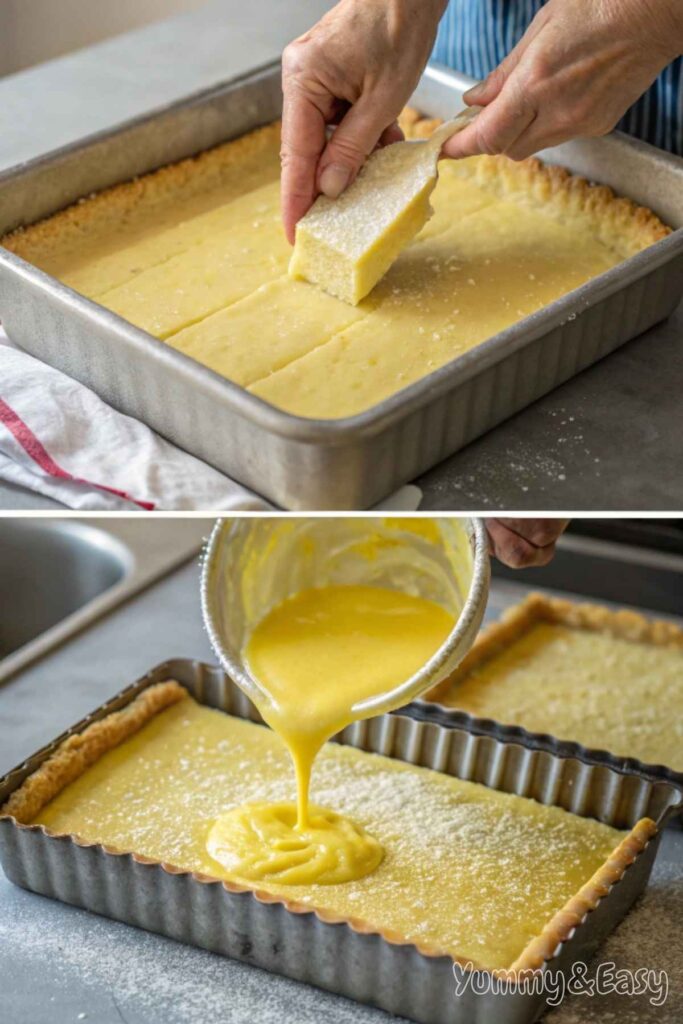
- Pour Filling Over Warm Crust: Once the crust is pre-baked, pour the lemon mixture over it while it’s still warm. This helps the layers adhere better.
- Bake Again: Return the pan to the oven and bake for 20-25 minutes, or until the filling is set and no longer jiggles in the center.
- Avoid Overbaking: Keep a close eye to prevent the filling from becoming too firm or developing cracks.
Cooling and Setting: Ensuring the Perfect Texture
- Cool Completely: Let the bars cool completely in the pan on a wire rack. This can take 1-2 hours.
- Chill: Once cooled, refrigerate the bars for at least an hour for best results. This firms up the filling, making slicing easier.
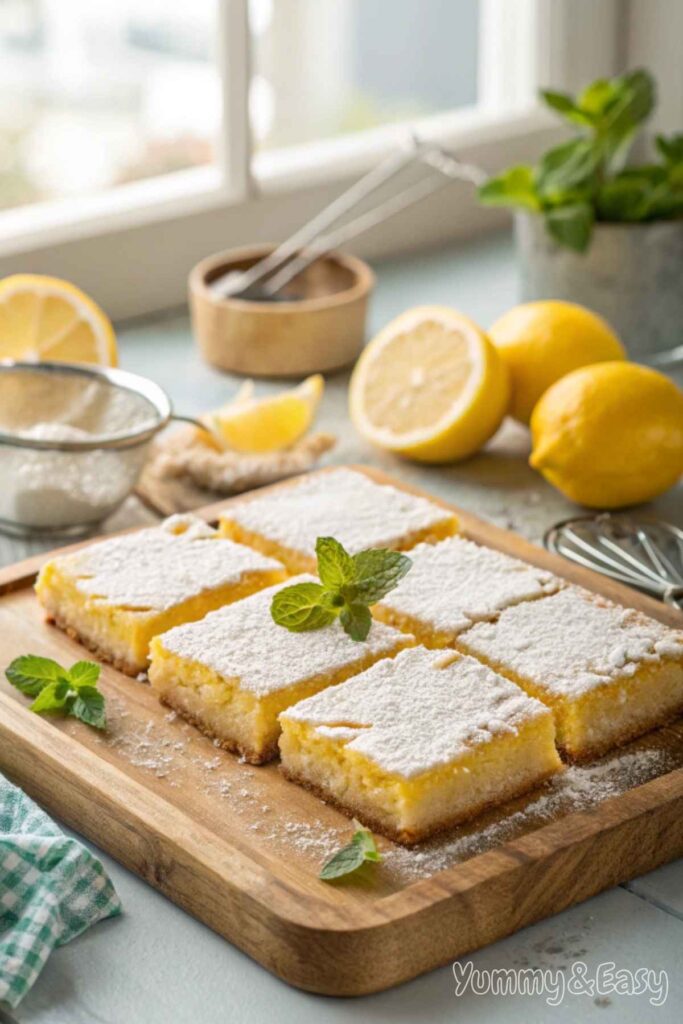
- Slice and Serve: Cut into squares or rectangles using a sharp knife. For a clean cut, wipe the knife between slices. Optionally, dust with powdered sugar before serving.
By meticulously following these steps, you’ll achieve homemade lemon bars with a crisp crust and a luscious, tangy filling—a treat that’s sure to impress.
Variations and Enhancements to the Classic Lemon Bars Recipe
While the traditional lemon bar recipe is undeniably delightful, exploring variations can add an exciting twist to this classic dessert. Here are some popular adaptations:
Incorporating Berries: Raspberry or Blueberry Lemon Bars
Adding berries introduces a burst of color and flavor. To make Raspberry Lemon Bars:
- Prepare the Base: Follow your standard lemon bars recipe to create the shortbread crust.
- Add Berries: Sprinkle fresh or frozen raspberries evenly over the pre-baked crust.
- Pour Filling: Combine the lemon filling as usual and pour it over the berries.
- Bake: Proceed with baking until the filling is set.
Similarly, for Blueberry Lemon Bars, substitute raspberries with blueberries. The combination of tangy lemon and sweet berries offers a refreshing twist.
Gluten-Free and Vegan Alternatives
For those with dietary restrictions, it’s possible to modify the lemon bars recipe:
- Gluten-Free: Replace regular flour in the crust with a gluten-free flour blend. Almond flour can also provide a nutty flavor and crumbly texture.
- Vegan: To achieve a similar consistency, substitute eggs in the filling with a mixture of silken tofu or aquafaba (chickpea brine). For the crust, use plant-based butter alternatives.
These adjustments ensure that everyone can enjoy this delectable treat.
Adding Herbs and Spices for a Unique Twist
Elevate your lemon bars by infusing herbs and spices:
- Lavender: Incorporate dried culinary lavender into the crust for a subtle floral note.
- Basil or Mint: To add a refreshing herbal flavor, finely chop fresh basil or mint and mix it into the filling.
- Ginger: Add ground ginger to the crust or filling to introduce a warm, spicy element.
Experimenting with these additions can transform your lemon bars into a gourmet dessert.
Serving and Storing Your Lemon Bars
Proper serving and storage techniques ensure your lemon bars remain fresh and delicious.
Presentation Tips: Cutting and Plating
- Chill Before Cutting: After baking, let the lemon bars cool completely before refrigerating for at least an hour. This firms up the filling, making it easier to slice cleanly.
- Use a Sharp Knife: For precise cuts, use a sharp knife, wiping it clean between slices to maintain tidy edges.
- Garnish: Dust the tops with powdered sugar just before serving. For added flair, consider garnishing with thin lemon slices or a sprig of mint.
Storage Solutions for Freshness
- Refrigeration: Place the lemon bars in an airtight container, separating layers with parchment paper to prevent sticking. They can be stored in the refrigerator for up to a week.
- Room Temperature: If consumed within two days, they can be kept at room temperature in a cool, dry place, though refrigeration is recommended to maintain firmness.
Freezing Lemon Bars for Future Enjoyment
To enjoy lemon bars later:
- Pre-Freeze: Arrange the sliced bars on a baking sheet lined with parchment paper and freeze until solid.
- Store: Transfer the frozen bars to a freezer-safe container or bag, separating layers with parchment paper.
- Thawing: When ready to eat, thaw the desired number of bars in the refrigerator overnight or at room temperature for a few hours.
Properly stored, lemon bars can be frozen for up to three months without significantly losing quality.
Looking for more easy meals? Here are some ideas!
- Apple Pie Recipe: The Best Homemade Pie Guide
- Chicken Bone Broth Recipe You’ll Love – Easy, Nutritious & Rich
- Pancake Recipe Without Milk – Fluffy, Easy & Absolutely Delicious
Frequently Asked Questions
Many bakers have common questions when making a lemon bars recipe. Below are answers to some of the most frequently asked ones.
Can I use bottled lemon juice instead of fresh?
While bottled lemon juice is convenient, fresh lemons provide a brighter, more natural flavor. Bottled juice can sometimes taste overly acidic or artificial. If fresh lemons aren’t available, ensure you use high-quality bottled juice without additives.
How do I prevent the crust from becoming soggy?
A soggy crust can ruin the texture of your lemon bars. To avoid this:
- Pre-bake the crust until lightly golden before adding the filling.
- Use the right flour-to-butter ratio to ensure a sturdy shortbread base.
- Avoid overmixing the filling, which can create excess moisture.
What’s the best way to achieve a firm yet gooey feeling?
For the perfect consistency:
- Measure ingredients accurately, especially eggs and sugar.
- Bake at the right temperature (350°F or 175°C) to allow the filling to set without becoming rubbery.
- Chill the bars before slicing; this helps them firm up without losing their soft, custard-like texture.
How long can lemon bars be stored at room temperature?
If the weather is cool, lemon bars can stay at room temperature for up to two days. However, they should be stored in an airtight container in the refrigerator for up to a week to maintain their freshness.
Embracing the Joy of Baking Lemon Bars
Baking a lemon bar recipe is a rewarding experience, blending the simplicity of baking with the bright, zesty flavors of citrus. Whether you stick with the classic version or experiment with berries, spices, or gluten-free alternatives, these bars are a guaranteed crowd-pleaser.
So, the next time you’re craving something sweet yet refreshing, whip up a batch of homemade lemon bars. Share them with family and friends, or keep a stash for yourself—you won’t regret it! If you’re looking for more easy dessert ideas, stay tuned for more delicious recipes coming your way. Happy baking!